Menu

Mint and Kiwi ice cream

prep time
10 mins
total time
10 mins

Author: Neha Sharma

Ingredients-

  • Sweet kiwis- 4
  • Full fat milk- 4 cup
  • Cornflour- 2 tbsp
  • Sugar- 10 tbsp or as required
  • Whipping cream- 8 tbsp
  • Mint Leaves- 10 to 15

Method-

  1. In a bowl, mix cornflour and ½ cup of milk and keep aside.
  2. In a deep non-stick pan boil the remaining milk on medium flame for 3 to 4 minutes, while stirring in between.
  3. Add cornflour mixture to the boiled milk, mix well and cook on a medium flame till milk reduced half its quantity for about 15 to 20 minutes, while stirring continously. Switch off the flame and let it cool completely.
  4. In the mean time blend kiwis and mint leaves with sugar & make a puree.
  5. When the milk mixture cools down completely whip the mixture with an electronic blender till smooth.
  6. Once the mixture seems smooth add cream and beat for one more time until smooth.
  7. Add kiwi mint puree and mix well.
  8. When everything is well combined transfer the mixture into an aluminium bowl or tin. Cover with an aluminium foil or cling wrap and freeze until semi-set for about 3 hours. 
  9. Pour the semi set ice cream into a blender and blend until it is smooth.
  10. Transfer the mixture back into the same aluminium bowl or tin. (Repeat step 8 & 9 twice to get extra smooth ice cream- optional) 
  11. Cover with an aluminium foil or cling wrap then cover with a tight lid and freeze overnight.

    Note:

      *If your whipping cream is sweet reduce the quantity of sugar.

      Prep time
      10 mins
      Cook time
      5 mins
      Total time
      15 mins
      Author: Neha Sharma

      Ingredients-

      • Cinnamon / Dal Chini- 4 pieces of 1 cms
      • Fennel Seeds / Saunf- 2 tbsp
      • Cumin Seeds / Jeera- 1 tbsp
      • Bay Leaf / Tez Patta- 2
      • Cloves / Laung- 5
      • Mace / Jatiphala- 2
      • Kalpasi / Black Stone Flower- 4
      • Coriander Seeds / Powder- 3 tbsp
      • Dry Red Chilli- 5
      • Star Anise / Anisipu- 1
      • Black Pepper / Kali Mirch- 1 tbsp
      • Green Cardamom / Elaichi- 5
      • Black Cardamom / Elaichi- 1

      Method-

      1. In a pan dry roast all the whole spices on low heat for 5 mins.
      2. Take coriander powder and chilli powder, add that after the whole spices are well roasted and roast it for about 30 seconds.
      3. Transfer them to a plate and let it cool down for 5 mins.
      4. Transfer it in a grinder and grind into a very fine powder and let it cool completely.
      5. Store it in an air tight container.
      Don't forget to try our lip smacking Biryani Recipes. 

          Indo Chinese style vegetable manchurian recipe

      Prep time
      20 mins
      Cook time
      40 mins
      Total time
      1 hour
      Author: Neha Sharma

      Ingredients-

      • Cabbage- 250 gms
      • Cornflour- 1/2 Cup + 1 tbsp
      • Maida/All purpose flour- 1/2 Cup 
      • Carrots- 1 Cup 
      • Black pepper powder- 1 tbsp
      • Red chilli powder- 1 1/2 tbsp
      • Ginger garlic paste- 2 tbsp
      • Food color- A pinch (red colour) 
      • Capsicum- 1/4 Cup (Finely Chopped) 
      • Onion- 1 (Finely Chopped) 
      • Spring onion- 1/4 Cup (Finely Chopped) 
      • Vinegar- 1 tbsp
      • Soy sauce- 1 tbsp
      • Sugar- 1/2 tbsp
      • Salt to taste
      • Oil for cooking

      Method-

      For Manchurian balls:

      1. Grate 1/2 cup carrots and cabbage (separately) using mixer grinder or a grater.
      2. Mix carrots and cabbage in a bowl, add corn flour, maida, black pepper powder, 1 tbsp ginger garlic paste, 1/2 tsp red chilli powder, a pinch of red food color and salt.
      3. Mix everything well to form a soft mixture (adjust the quantity of cornflour and maida to get the required consistency) and shape them into small round balls. 
      4. Heat some oil and fry Manchurian balls till they become golden in color.

      For gravy:

      1. In a small bowl make slurry by adding 1 tbsp corn flour + 2 tbsp water. Mix well and keep aside. 
      2. Heat 3 tbsp oil and add 1 tbsp ginger garlic paste. Stir fry for a minute.
      3. Now add chopped onion. Again saute this for a few seconds (do not overcook). 
      4. Then finely chop remaining 1/2 cup carrots, capsicum and stir fry.
      5. Add 1 tbsp red chilli powder, sugar, soy sauce and 1/4 cup water.
      6. Mix well, then add salt, vinegar and slurry (prepared in step 1).
      7. Keep stirring the gravy until thickens.
      8. Once done, add fried Manchurian balls and some chopped spring onion to it and mix well. 
      9. Serve hot with Fried Rice or Hakka Noodles. Enjoy!

      Hariyali Chicken Recipe

      Hariyali chicken recipe, palak chicken, dry gravy chicken, green chicken, coriander and mint chicken recipe

      Prep time
      20 mins
      Cook time
      40 mins
      Total time
      1 hour
      Author: Neha Sharma

      Ingredients-

      • Chicken- 500 gms
      • Onions- 2 (medium sized, thinly sliced)
      • Curd- 3 tbsp
      • Fresh Coriander/Dhaniya- 1 Cup
      • Mint/pudina leaves- 1 Cup
      • Green chillies- 4
      • Ginger Garlic Paste - 2 tbsp
      • Butter- 2 tbsp
      • Kasuri methi- 1 tbsp
      • Black Pepper powder- 1/2 tbsp
      • Garam masala- 1 tbsp
      • Cumin/jeera powder- 1/2 tbsp
      • Bay leaf- 1
      • Black cardamom/elaichi- 1
      • Oil- 3 tbsp

      Method-

      1. In a mixer grinder, grind green chillies, fresh coriander and mint/pudina leaves by adding a little water to a fine paste. Keep this aside.
      2. In a pan, heat oil along with 2 tbsp butter.
      3. Add onions, fry till they become slightly pink in color while frying onions add a bayleaf and black Cardamom.
      4. Once done, add chicken. Mix it well and cook on medium flame for a min.
      5. Add cumin powder, garam masala, black Pepper powder, curd and mix it well.
      6. Add the green puree prepared in step 1 and salt.
      7. If required, add a little water. Cover and cook till the chicken is done.
      8. Once the chicken is cooked, add kasuri methi/dried fenugreek leaves and add it to the chicken.
      9. Cover and cook for another minute then switch off the flame.
      10. Serve hot. Enjoy! 

      Butter Scotch Cake Recipe

      Butterscotch cake recipe indian | Butterscotch Cake | Indian Cake recipes

      Prep time
      20 mins
      Cook time
      40 mins
      Total time
      1 hour
      Author: Neha Sharma

      Ingredients-

      For Sponge Base:

      • Maida/All-purpose flour- 1 1/2 Cups
      • Homemade condensed milk- 1/2 Cup
      • Milk- 1 Cup
      • Baking powder- 1 tbsp
      • Baking soda- 1/2 tbsp
      • Vinegar- 1 tbsp
      • Sugar- 1/3 Cup
      • Butter- 1/3 Cup
      • Butterscotch essence- 1 tbsp
      • Yellow food color- 1/4 tbsp

      For Sugar Syrup-

      • Sugar- 5 tbsp
      • Water- 5 to 6 tbsp
      • Butter scotch Essence- 1/4 tbsp

      For Pralin-

      • Almonds- 1/2 Cup
      • Sugar- 3/4 Cup
      • Butter- 2 tbsp

      For Frosting-

      Butterscotch cake recipe indian | Butterscotch Cake | Indian Cake recipes

      Method-

      To make Sugar Syrup:

      1. In a small bowl mix 5 tbsp sugar with 5-6 tbsp water and 1/4 tbsp of utter scotch essence, let it dissolve completely. Sugar syrup is ready. Keep aside.

      To make praline:

      1. In a pan dry roast almonds on medium flame for 5 mins. Crush the almonds and keep it aside.
      2. In a pan, add sugar and keep the flame on medium and let the sugar melt (Do not stir until it starts melting).
      3. Meanwhile keep a butter paper or a plate greased with butter ready.
      4. Once the sugar melts, add butter and crushed almonds. Quickly mix it and pour it on the butter paper or greased plate.
      5. Spread it nicely on the paper/plate and let it set for atleast 10 to 15 mins.
      6. Once it is set, using a rolling pin crush it in to very tiny pieces. Keep it aside (Reserve some bigger pieces for decoration). 

      To make Sponge Cake:

      1. Pre-heat pressure cooker with 2 cups of salt and place a wire stand in it.
      2. In a bowl sift the flour, baking soda and baking powder.
      3. In another bowl, add butter and sugar beat it until soft and fluffy then add condensed milk and beat again.
      4. Add butterscotch essence, yellow food color and mix well.
      5. Now add half of the sifted flour mixture, half milk and fold well, then add in the remaining flour, milk and mix well.
      6. Apply butter to a cake tin or a steel/aluminium container of 7 inch diameter. Then place a butter paper (for smooth and perfect cake) and apply butter on butter paper.
      7. Transfer the batter to cake tin and place it into the preheated cooker and bake for 35 to 40 mins. Insert a toothpick in the middle to check if it is baked perfectly.
      8. After Baking, remove the butter paper, place it on a wire stand and let it cool down completely.

      Assembling:

      1. Add the chilled whipping cream (if using non dairy whipping cream do not add sugar, if not add sugar in the next step) to a bowl and whisk until soft and fluffy.
      2. Add yellow food color, butterscotch essence and 1 tbsp caramel sauce and beat until stiff peaks. Refrigerate it until you are ready to use it. Whipped Cream is ready!

      Frosting:

      1. Take 3-5 bowls and keep a plate over it or simply use a turn table!
      2. Cut cake into three layer horizontally by turning the table. Transfer the layers to a plate.
      3. Touch the turn table/plate with a drop of cream in center to ensure safe decoration and then add the bottom sponge layer to it.
      4. Spread 3-4 tbsp of prepared sugar syrup to it (be generous). Spread a good ½ inch layer of cream to it.
      5. Sprinkle praline crunch on the cream and cover it with whipped cream.
      6. Place the second layer and spread the syrup, cream, praline crunch, cream then the third layer.
      7. For the final layer, spread syrup! Take 2-3 big portion/spoon of stiff cream and then spread it on top as well as on sides. Then make it smooth with the help of a palette or back side of a knife! (please be extremely careful and be gentle to the cake otherwise you will ruin it).
      8. If you see any crumbs or cracks, do a crumb coat by applying more cream.
      9. Place the cake in the freezer for 30 mins to 1 hr. Crumb coat have been set, now for the final icing, take a dollop/big portion of cream and spread it.
      10. Give finishing to the cake and clean the cake board with a paper napkin.
      11. Now add the remaining cream to a piping bag fitted with a star nozzle. Make rosettes or show your creativity and make a border.
      12. Cover cake sides with praline crunch and fill center of the cake with caramel sauce.
      13. Place big praline crunch pieces in the center of the cake.
      14. Refrigerate for an hour before serving. Eggless butterscotch cake is ready!! 
      Don't forget to try Rasmalai Cake, White forest Cake, Pineapple Cake.

      Home-made Condensed Milk Recipe

      homemade condensed milk recipe, condensed milk recipe indian, sweetened condensed milk recipes, instant condensed milk recipe, condensed milk meaning, how to make condensed milk quickly, condensed milk recipes no bake, condensed milk uses,Condensed Milk Recipe, Easy and Quick condensedcmilk recipe, evaporated milk recipe,nestle condensed milk recipes indian, quick dessert recipes with condensed milk, condensed milk recipe by sanjeev kapoor, condensed milk recipe at home, simple recipes with sweetened condensed milk, condensed milk recipes no bake, easy recipes with milkmaid by chakhley, desserts with condensed milk without baking,

      Prep time
      5 mins
      Cook time
      20 mins
      Total time
      25 mins
      Yields: 330 Grams
      Author: Neha Sharma

      Ingredients-

      • Toned Milk - 500ml or 1/2 kg
      • Sugar - 1 Cup
      • Baking Soda - A Pinch
      homemade condensed milk recipe, condensed milk recipe indian, sweetened condensed milk recipes, instant condensed milk recipe, condensed milk meaning, how to make condensed milk quickly, condensed milk recipes no bake, condensed milk uses,Condensed Milk Recipe, Easy and Quick condensedcmilk recipe, evaporated milk recipe,nestle condensed milk recipes indian, quick dessert recipes with condensed milk, condensed milk recipe by sanjeev kapoor, condensed milk recipe at home, simple recipes with sweetened condensed milk, condensed milk recipes no bake, easy recipes with milkmaid by chakhley, desserts with condensed milk without baking,

      Method-

      1. In a deep pan or wok, add milk and then add sugar.
      2. Heat this up on medium-high flame, while stirring continously. It will take about 15 to 20 mins to reduce.
      3. After 20 mins you will see a vibrant color and the texture of other milk will be thick.
      4. Switch off the flame and add the baking soda to it. Stir well and let it cool down completely.
      5. Once it cools down, stir it well and store in an air tight container and refrigerate.

      Notes-

      * 1 cup- 250ml
      * Baking Soda is Optional, youycan skip if you want. 

      Moringa/Drumstick Leaves Powder Recipe

      Moringa plant is beginning to gain more popularity as a new “superfood” for its highly nutritious profile and powerful anti-inflammatory, antioxidant, and tissue-protective properties among many other health benefits.

      How to make moringa leaves powder, weight loss recipe

      Moringa oleifera, also known as horseradish tree, ben tree, or drumstick tree, is a small tree from India, Pakistan, and Nepal that has been used for generations in Eastern countries to treat and prevent diseases such as diabetes, heart disease, anemia, arthritis, liver disease, and respiratory, skin, weight gain and digestive disorders.

      Moringa has become popular as a natural leaf powder supplement, although the pods, roots, bark, flowers, seeds, and fruits are also edible. It is used as a traditional remedy for many ailments. (Read more-mindbodygreen). 

      How to make moringa leaves powder, weight loss recipe

      Prep time
      5 mins
      Dry time
      3 days
      Total time
      3 days 5 mins
      Author: Neha Sharma

      Ingredients-

      • Moringa/Drumstick Leaves- 2 Large Bowls

      Method-

      1. Wash the moringa leaves thoroughly with fresh water.
      2. Keep them on a cotton cloth, once all the water dries up. Pluck the leaves in a bowl and discard the stems.
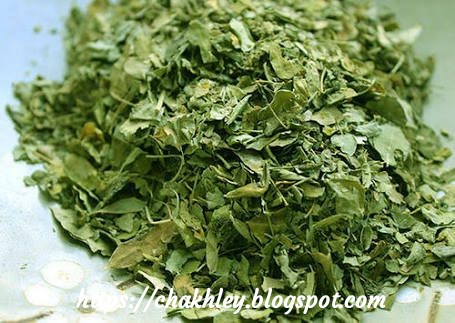
      3. Once all the leaves are collected cover them with a dry cotton cloth and let the leaves shade dry completely until they shrunk and become crunchy. 
      4. This process may take upto 5 days but make sure not to sun dry the leaves.
      5. Once the leaves are completely shrunked and while touching them you can hear crunchy crisp sound (Refer Image Below) (You can also store dried leaves in an air tight container and use it while preparing dry veggies and gravies). 
      6. Transfer them into a dry mixer grinder and grind until it turns into fine powder. 
      7. Store this powder in an air tight container and away from the sunlight.
      8. You can use this powder in making tea, chapati/Bread, Rice, veggies etc. 
      How to make moringa leaves powder, weight loss recipe

      Tawa Bread Pizza Recipe

      Tawa Pizza, Bread Pizza, Home made Pizza Recipe

      Prep time
      10 mins
      Cook time
      10 mins
      Total time
      20 hins
      Author: Neha Sharma

      Ingredients-

      • Bread slices- 8 
      • Capsicum- 1 (Chopped) (You can use toppings of your choice)  
      • Tomato- 1 (Sliced) 
      • Onion- 1 (Sliced) 
      • Oregano- 1 tbsp
      • Chilli flakes- 1 tbsp
      • Cheese slices- 3
      • Mozzarella cheese- 1/2 Cup 
      • Pizza sauce- 2-3 tbsp 
      • Butter- 1 tbsp 

      Method-

      Pizza Base:

      1. Remove sides of bread using a knife.
      2. With a rolling pin/Belan, roll all the bread slices one at a time.
      3. After rolling the bread slices, place 4 bread slices adjacent to each other to form a large square. Keep overlap between the edges.
      4. Moist the overlapping edges with some water and press the edges so that they stick together.
      5. Repeat the same steps for remaining 4 slices.
      6. Place cheese slices over one of the square pizza base leaving some margin around the edges.
      7. Apply a little bit of water over the edge of the pizza base and place the other pizza base over it. Press the sides to seal the edges.

      Topping:

      1. Place the prepared base on a plate and apply some pizza sauce evenly over it. Add grated mozzarella cheese over it.
      2. Place some capsicum pieces along the edge of the base, then add onion slices, tomato slices on the pizza base.
      3. Sprinkle some more mozarella cheese on the toppings.

      Baking:

      1. Heat butter in a pan/skillet/tawa. Place the pizza on it.
      2. Cover the pizza with a lid and bake it on low medium flame till the base turns golden and crispy.
      3. Once it is cooked, sprinkle some oregano and chili flakes.
      4. Serve hot. Enjoy!! 

      Rasmalai Cake in Pressure Cooker Recipe 

      Rasmalai Cake Recipe | Home-made Cake | Ras malai

      Prep time
      20 mins
      Cook time
      40 mins
      Total time
      1 hour
      Author: Neha Sharma

      Ingredients-

      For Sponge Base:

      • Maida/All Purpose Flour- 1 cup
      • Condensed milk- 200 gms
      • Powdered sugar- 4 tbsp
      • Corn flour- 2 tbsp
      • Unsalted butter- 1/2 cup
      • Almond Essence- 1/2 tbsp
      • Milk- 1 Cup
      • Baking powder- 1 tbsp
      • Baking soda- 1/2 tbsp
      • 1 tbsp milk + few saffron strands
      • Yellow food colour- 3 drops/A pinch (if using powder) 

      For Frosting:

      Rasmalai Cake Recipe | Home-made Cake | Ras malai

      Method-

      Sponge:

      1. Pre-heat pressure cooker with 2 cups of salt and place a wire stand in it.
      2. In a bowl, soak few saffron strands in 2 tbsp of milk. Mix and keep aside. 
      3. In another bowl, add butter, powdered sugar and beat till it becomes smooth.
      4. Now add condensed milk and beat it again.
      5. Then add soaked saffron along with 1/2 cup of milk and mix.
      6. In a different bowl sieve maida (APF), corn flour, baking powder, baking soda. Mix well with a spatula or spoon. 
      7. Add remaining milk and mix gently.
      8. Apply butter to a cake tin or a steel/aluminium container of 7 inch diameter. Then place a butter paper (for smooth and perfect cake) and apply butter on butter paper.  
      9. Transfer the batter to cake tin and place it into the preheated cooker and bake for 35 to 40 mins. (If baking in oven- Preheat Oven for 10 minutes and Bake on 180 degrees celsius for 35-40 minutes). 
      10. After baking, let it cool down completely then carefully demould the cake and remove the parchment paper.

      Assembling:

      1. Meanwhile, chop 3-4 pieces of rasmalai and keep it aside. 
      2. In a bowl, add whipping cream, along with 3 drops of yellow food colour and whip it for about 2 minutes.
      3. After 2 minutes, add 1/4 cup ras Malai milk/rabdi (Should be chilled) and whip untill stiff peaks.
      Rasmalai Cake Recipe | Home-made Cake | Ras malai

      Frosting:

      1. Take 3-5 bowls and keep a plate over it or simply use a turn table!
      2. Cut cake into three layer horizontally by turning the table. Transfer the layers to a plate.
      3. Touch the turn table/plate with a drop of cream in center to ensure safe decoration and then add the bottom sponge layer to it.
      4. Spread 3-4 tbsp of rabdi/rasmalai milk on it (be generous). Spread a good ½ inch layer of prepared cream to it. 
      5. Then place some chopped rasmalai pieces and cover the rasmalai pieces with some more cream to make sure the second layer sticks. 
      6. Place the second layer and spread the rabdi, cream, chopped rasmalai pieces, cream then the third layer.
      7. For the final layer, spread rabdi! Take 2-3 big portion/spoon of stiff cream and then spread it on top as well as on sides of the cake. Then make it smooth with the help of a palette or back side of a knife! (please be extremely careful and be soft to the cake otherwise you will ruin it). 
      8. If you see any crumbs or cracks, do a crumb coat by applying more cream.
      9. Place the cake in the freezer for 30 mins. Crumb coat have been set, now for the final icing, take a dollop/big portion of cream and spread it evenly.
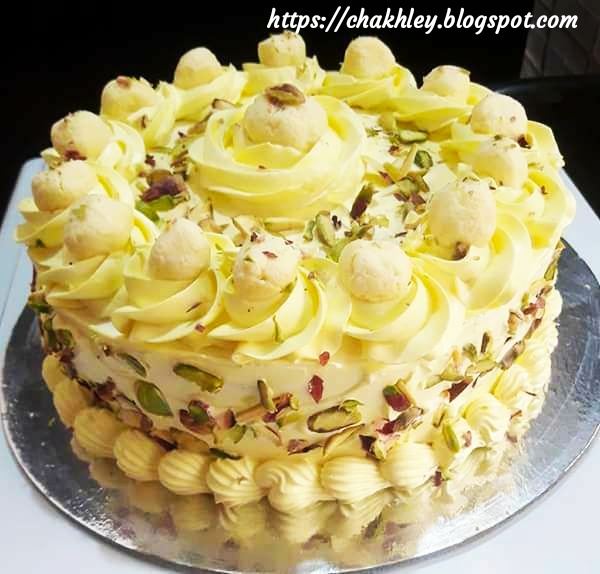
      10. Now add the remaining cream to a piping bag fitted with a star nozzle. Make rosettes or show your creativity make some designs and place remaining rasmalai pieces on top of your designs.
      11. Spinkle some chopped pistachios and saffron strands on top of the cake and decorate the sides with pistachios.
      12. Using the star nozzle piping bag make a bottom border.
      13. Refrigerate for 2 hours before before serving, eggless Rasmalai cake is ready. 
      14. Enjoy!!

      Notes-

      * 1 cup = 250 ml
      Don't forget to try White Forest Cake, Whole Wheat Orange Cake Recipe

      Rasmalai Recipe

      Ras malai or rossomalai is a dessert originating from the Indian subcontinent. The name ras malai comes from two words in Hindi: ras, meaning "juice", and malai, meaning "cream". It has been described as "a rich cheesecake without a crust". The sweet is of Bengali origin; according to K.C. Das Grandsons, it was invented by K.C. Das.

      Rasmalai Recipe, Cheese Balls Recipe, Indian Desserts, Rabdi Recipe, Rasgullas Recipe

      Ras malai consists of sugary white cream, or yellow-coloured (flattened) balls of chhana soaked in malai (clotted cream) flavoured with cardamom. It is cooked in sugar syrup and milk with saffron, pistachios and kheer as stuffing. Homemade ras malai is usually made from powdered milk, all-purpose flour, baking powder and oil, which are kneaded to form a dough, moulded into balls, and dropped into simmering milk cream. (Source-Wikipedia)

      Rasmalai Recipe, Cheese Balls Recipe, Indian Desserts, Rabdi Recipe, Rasgullas Recipe

      Prep time
      10 mins
      Cook time
      25 mins
      Total time
      35 mins
      Author: Neha Sharma

      Ingredients-

      For Chena/Rasgulla:

      • Amul Cow’s Milk- 1 Litre 
      • Lemon juice- 2 tbsp 
      • White vinegar- 1 tbsp
      • Sugar- 1 Cup 
      • Water- 3 Cups 

      For Rabri/Rabdi:

      • Full fat milk- 1 Litre
      • Few saffron strands 
      • Sugar- 1/2 Cup
      • Chopped Nuts- 1/4 Cup (Pistachios,Almonds)
      Rasmalai Recipe, Cheese Balls Recipe, Indian Desserts, Rabdi Recipe, Rasgullas Recipe

      Method-

      For Chena:

      1. In a heavy bottom pan or wok/kadhai, pour Cow milk and bring it to a boil.
      2. Turn off the flame, add a tbsp of lemon juice and slowly stir the milk. Add the remaining lemon juice and stir till milk starts to curdle.
      3. Now add white vinegar to the milk and gently stir the milk. Milk solids will separate from whey water in a minute or so.
      4. Strain the curdled milk using a siever and a cheese cloth.
      5. Run some cold water on chena separated after straining.
      6. Lift the cheese cloth from all the sides and squeeze as much water as possible, tie it up and hang it on a tap for 20 min.
      7. After 20 min, knead the Chena with your hands for 4 minutes.
      8. Divide it in small equal portions and roll them in to the shape of a ball with using your hands. 
      9. Make sure that the chenas don’t have any cracks and then using your palms gently flatten the chena balls. Keep aside. 
      10. In a pressure cooker, add 2 cups of sugar and 1 cup of water. 
      11. Once the sugar melts completely, add 1 cup of water and again bring it to a boil.
      12. Drop the chenas in the boiling syrup and cover the cooker using lid (do not remove the whistle).
      13. On a high flame cook the chenas for a minute and then turn down the flame to medium and cook for another 6 mins.
      14. After cookingcit for about 7 minutes, turn off the flame and immediately release the pressure (While holding the cooker place it under a tap and run cold water on its lid, make sure not to dip the base of cooker in water). 
      15. Once done, open the lid of pressure cooker and keep it aside. 
      Rasmalai Recipe, Cheese Balls Recipe, Indian Desserts, Rabdi Recipe, Rasgullas Recipe

      For Rabdi:

      1. In a pan, add 1 Litre of full fat milk and bring it to a boil.
      2. In a small bowl, add 1 tbsp of boiling milk and put saffron strands in it. Mix it well and add it back to the boiling milk.
      3. Lower the flame and stop stirring the milk. In a while you will see a thin layer of cream forming at the top.
      4. Stick the cream layer to the sides of the pan with the help of a spoon or spatula. 
      5. Repeat the step without stirring the milk till it reduces to one third of its quantity.
      6. Scrape off the cream from sides of the vessel and add it back to the milk.
      7. Now add chopped nuts and 1/2 cup of sugar to the milk. 
      8. Stir the milk, cook till it reduces a little more and then turn off the flame.
      9. For Rasmalai:
      10. Squeeze out the sugar syrup from chennas by pressing them between two spatulas or use your hands but be gentle otherwise you will break them. 
      11. While keeping the chenna pressed, drop it in the hot rabri. Repeat this step for the remaining chennas.
      12. Keep the rasmalai in refrigerator for atleast 2 hours before serving.
      13. Enjoy!!

      Cheesy Mushroom Pakoda/Fritters Recipe

      Crispy and spicy cheese stuffed mushroom Fritters recipe

      Prep time
      15 mins
      Cook time
      15 mins
      Total time
      30 mins
      Author: Neha Sharma

      Ingredients-

      • Button mushrooms- 10
      • Bread crumbs- 1 cup
      • Processed cheese- 1 cube (grated)
      • Mozzarella cheese- 3 tbsp (grated)
      • Red chili powder- 1/2 tbsp
      • Oregano- 1 tbsp
      • Cornflour- 1/2 Cup
      • All purpose flour/maida- 3/4 Cup
      • Black pepper powder- 1/2 tbsp
      • Ginger garlic paste- 2 tbsp
      • Salt- to taste
      Crispy and spicy cheese stuffed mushroom Fritters recipe

      Method-

      1. Wash and dry the mushrooms properly. Remove the stems and keep aside.
      2. In a bowl, add processed cheese cube, mozzarella cheese, oregano, red chili powder, chopped coriander and salt. Mix well until everything is combined.
      3. Fill the mushroom cavity with this cheese stuffing.
      4. In another bowl, add all purpose flour/maida, cornflour, black Pepper powder, ginger garlic paste and salt. Mix it well and add water to make batter of medium consistency (Neither very thick nor thin). 
      5. Dip stuffed mushrooms in the batter and coat them evenly then coat the mushrooms with breadcrumbs and refrigerate for 15 mins.
      6. After 15 min, heat oil in a pan or wok and drop the mushrooms in the oil.
      7. Fry on medium high flame until they become golden in color.
      8. Once done, take them out on an absorbent paper and serve. 
      Don't forget to try Crispy Chicken Pop Corn.

      Crispy Chicken Popcorn Recipe

      chicken popcorn recipe video, How to make chicken popcorn at home, chicken popcorn recipe by sanjeev kapoor, spicy popcorn chicken recipe, kfc popcorn chicken ingredients, popcorn chicken recipe baked, chicken popcorn in tamil, chicken popcorn recipe in malayalam,KFC Style Spicy Popcorn Chicken, Popcorn chicken recipe | Kfc style popcorn, Simple and Easy recipe for crispy and juicy KFC chicken popcorn, Popcorn chicken recipe | How to make kfc style popcorn chicken, KFC Style Spicy Popcorn Chicken, chicken popcorn recipe video, chicken popcorn recipe by sanjeev kapoor, spicy popcorn chicken recipe, popcorn chicken recipe baked, popcorn chicken recipe without buttermilk, chicken popcorn recipe in malayalam, kfc popcorn chicken ingredients, popcorn chicken recipe masterchef, Popcorn Chicken Recipe, chicken Recipes, How to make Popcorn Chicken at Home / Easy Step-by-Step, Chicken popcorn -How to prepare KFC style Chicken Popcorn, chicken-popcorn, KFC Style Spicy Popcorn Chicken, Simple and Easy recipe for crispy and juicy KFC chicken popcorn, Popcorn chicken recipe | How to make kfc style popcorn chicken, KFC Style Spicy Popcorn Chicken

      Prep time
      30 mins
      Cook time
      15 mins
      Total time
      45 mins
      Author: Neha Sharma

      Ingredients-

      Marination:

      • Boneless chicken- 300 gms
      • Egg- 1
      • Red chili powder- 1 tbsp
      • Black Pepper Powder- 1/4 tbsp
      • Turmeric/Haldi powder- 2 pinch
      • Ginger garlic paste- 2 tbsp
      • Lemon juice- 1 tbsp
      • Salt to taste

      Coating:

      • Bread Crumbs- of 4 breads
      • Cornflour- 1/2 Cup 
      • Maida/ All purpose flour- 3 tbsp
      • Salt to taste

      Seasoning:

      • Red chili powder- 1/2 tbsp
      • Oregano- 1/4 tbsp
      • Maggi Masala Magic- 1/2 sachet (See notes)
      • Chaat Masala- 1/2 tbsp
      • Salt to taste
      chicken popcorn recipe video, How to make chicken popcorn at home, chicken popcorn recipe by sanjeev kapoor, spicy popcorn chicken recipe, kfc popcorn chicken ingredients, popcorn chicken recipe baked, chicken popcorn in tamil, chicken popcorn recipe in malayalam,KFC Style Spicy Popcorn Chicken, Popcorn chicken recipe | Kfc style popcorn, Simple and Easy recipe for crispy and juicy KFC chicken popcorn, Popcorn chicken recipe | How to make kfc style popcorn chicken, KFC Style Spicy Popcorn Chicken, chicken popcorn recipe video, chicken popcorn recipe by sanjeev kapoor, spicy popcorn chicken recipe, popcorn chicken recipe baked, popcorn chicken recipe without buttermilk, chicken popcorn recipe in malayalam, kfc popcorn chicken ingredients, popcorn chicken recipe masterchef, Popcorn Chicken Recipe, chicken Recipes, How to make Popcorn Chicken at Home / Easy Step-by-Step, Chicken popcorn -How to prepare KFC style Chicken Popcorn, chicken-popcorn, KFC Style Spicy Popcorn Chicken, Simple and Easy recipe for crispy and juicy KFC chicken popcorn, Popcorn chicken recipe | How to make kfc style popcorn chicken, KFC Style Spicy Popcorn Chicken

      Method-

      1. Take all the ingredients mentioned under marination and mix them well. Keep it aside for 30 minutes. 
      2. For bread crumbs take 4 bread slices (remove the sides of bread) and grind them in a mixer.
      3. Now in a bowl add cornflour, all purpose flour/Maida, bread crumbs and salt. Mix it well.
      4. Start coating the pieces of marinated chicken with cornflour & bread crumbs mixture. All the chicken pieces should be perfectly coated. 
      5. Heat oil in a pan or wok/kadhai and drop the chicken pieces in the oil. Fry them till they become golden brown.
      6. Once done, take them out on an absorbent paper.
      7. Now take a big plastic box, add all the ingredients mentioned under seasoning. Mix it well.
      8. Transfer the fried chicken pieces to the box. 
      9. Seal the box and shake it for few seconds to give a good coat of seasoning around each piece of chicken.
      10. Crispy chicken popcorns are ready, serve it with mayo or your favourite dip. Enjoy!!

      Notes-

      • You can use 1 tbsp of Garam Masala Powder if you don't have Maggi Masala.
      If you like this recipe don't forget to try other chicken recipes

      Name

      About Me

      photo

      Hello! My name is Neha Sharma. I am Passionate about cooking and travelling.It's inspirational, challenging, creative and a great stress buster.
      Learn More →


      Featured